Key Takeaways:
- Clear aperture is the specified high-quality portion of an optical component.
- It is measured in millimeters or as a percentage of the lens’s surface area, indicating manufacturing demands.
Clear Aperture and Manufacturing Challenges in Optical Components
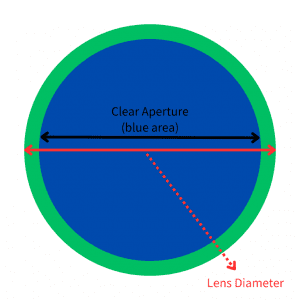
When producing optical components, there is often a decrease in surface quality near the component’s edge. The specified diameter that must meet optical criteria, encompassing surface accuracy, quality, and coating, is known as the clear aperture. However, due to manufacturing limitations, achieving a clear aperture covering the entire optical component is not feasible.
This measurement can be represented in millimeters or as a percentage of the lens’s total surface area. For example, a lens with a 50mm diameter might have a measurement depicted as 49mm or 96%. Generally, the higher this value, the more challenging it becomes to manufacture, as the required specifications extend toward the outer edge of the optic. The overall quality of the optical component is influenced by various manufacturing tolerances, with this measurement being a crucial specification in this regard.

| Clear Aperture | Quality |
| ≥ 80% | Commercial Quality |
| ≥ 90% | Precision Quality |
| R100% | Manufacturing limit |
GREAT ARTICLE!
Share this article to gain insights from your connections!


