Edge blackening, using blackening paint, reduces stray light and enhances imaging by absorbing unwanted reflections.
Typically applied after coating and before assembly, edge blackening is used on non-optical surfaces to improve contrast and reduce internal reflections.
Common methods include manual, spray, inkjet, vacuum deposition, and laser-assisted techniques—each with its trade-offs in cost, durability, and precision.
Key challenges—adhesion, thickness uniformity, and whitening—can be mitigated through proper material selection, edge preparation, and curing.
As automation and nanocoating technology advance, intelligent production methods will enhance blackening quality and efficiency for high-performance optical applications.
What is Edge Blackening?
Edge blackening is a widely utilized optical technique aimed at reducing the effects of stray light, minimizing internal reflections, and enhancing the contrast of optical systems. This process involves applying a light-absorbing material, such as black paint or coating, to the edges of optical components like lenses, prisms, or windows.
It is generally performed after coating and gluing but before final assembly. By giving the surface a blackened appearance, it not only improves the aesthetic quality of the component but also plays a vital functional role in optical system performance.
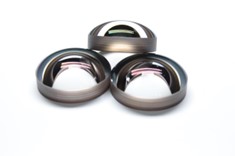
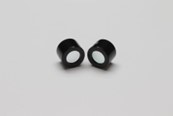
blacked optical components
blacked optical components
Optical Benefits of Edge Blackening
Stray light refers to unwanted light pollution—unintended light that reaches the sensor in an optical system. This can originate from:
Internal reflections from mechanical housing
Light outside the field of view entering the system
Secondary reflections from component surfaces
By blackening non-working surfaces (especially lens edges), designers can reduce scattered light and absorb secondary reflections, thus enhancing imaging contrast and minimizing ghosting or flare.
Common Edge Blackening Methods
1. Manual Blackening (Brush or Pen)
Materials: Matte black varnish, Indian ink, or Chubb Industrial black markers.
Advantages: Low-cost, flexible, and ideal for prototyping or small-volume production.
Disadvantages: Labor-intensive, inconsistent thickness, not suitable for high-precision or large-batch processing.
2. Spray Painting (with Masking)
Process: Use of spray guns with masking tape to protect non-target areas.
Coating Examples: Avian Black, Aeroglaze Z306.
Advantages: More uniform coverage, scalable for higher volumes.
Disadvantages: Requires precise masking; curing time may add to production duration.
3. Inkjet or Transfer Printing
Automation-friendly: Allows precise application of ink on component edges.
Use Cases: Imaging lenses, laser optics, and other high-precision systems.
Advantages: Excellent thickness control and positioning accuracy.
4. Vacuum Deposition / Sputtering
Materials: Chrome black or other opaque metals.
Advantages: Very durable, ideal for cleanroom environments and high-end applications.
Disadvantages: Higher cost and more complex processing.
5. Anodizing (for Metal Housings)
While not directly used on glass, black anodizing aluminum brackets or housings significantly reduces edge-scattered light when optics are mounted.
6. Laser Ablation + Coating
Combines precise laser machining with advanced coating processes.
Ideal For: VR/AR optics, infrared systems, and components with strict edge tolerances.
Benefits: High-resolution edge shaping and excellent coating cleanliness.
The lens after blackening
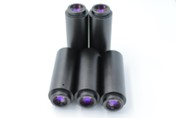
Bright chrome black coating
Anodizing of the metal jacket of the optical lens
Edge Blackening as a Processing Step
Preparation
Select the appropriate ink type and ratio according to product requirements. Ensure the lens is clean to promote adhesion.
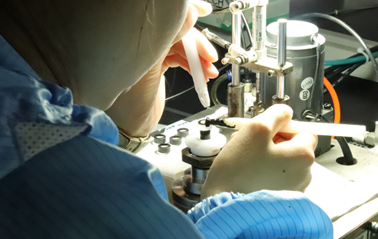
Blackening
Manual: Uses ink pens on a rotating table.
Semi-Automatic: Utilizes vacuum chucks and ink pens with limited automation.
Spray: Requires masking and careful spray technique followed by drying.
Curing
Curing parameters (temperature and time) vary by material and lens type. Full curing ensures the ink layer’s durability and resistance to abrasion.
Blackening process
Design Considerations
When implementing edge blackening into a lens system, several factors must be accounted for:
Adhesion: Surface treatments may be required for certain materials.
Heat & Moisture Resistance: Critical for spaceborne and defense optics.
Edge Quality: Poor polishing or contamination can result in adhesion issues or whitening.
Coating Thickness: Overly thick layers can peel or interfere with mechanical tolerance fits.
Common Issues and How to Address Them
1. Ink Adhesion
Poor adhesion often stems from:
Incorrect curing temperature or duration
Poor surface cleaning
Incorrect ink-to-hardener ratio
Solution: Cross-cut adhesion tests and better surface preparation.
2. Thickness and Uniformity
Oversized or uneven ink layers may affect:
Final product dimensions
Assembly alignment (e.g., lens concentricity)
Solution: Improve blackening technique and control ink flow.
3. Whitening or Spotting
Caused by:
Ground surface roughness
Incomplete ink penetration
Contaminants in the blackening area
Solution: Ensure pre-cleaning and inspect surface condition before coating.
Future Trends in Edge Blackening
Advancements in blackening methods are evolving rapidly. Emerging nano-coating technologies offer enhanced light absorption and durability. Meanwhile, intelligent automation continues to push boundaries in coating uniformity, curing efficiency, and production throughput.
Looking ahead, integration of smart edge processing and durable coatings will play a central role in the manufacturing of next-generation optical systems—from aerospace and machine vision to VR and defense optics.
Conclusion
Edge blackening is a critical yet often overlooked part of optical component design and manufacturing. From low-cost manual solutions to high-precision automated techniques, the choice of method and material directly impacts optical performance. By understanding the benefits, limitations, and evolving technologies, engineers and designers can better tailor edge blackening strategies to meet the rigorous demands of modern optics.